Cover 7 vs Trips
In our last two articles we talked about Cover 7 versus two receivers and a single receiver backside. In this article, we will cover adjustments to Trey and Trips formations. I’m going to cheat a bit here and also provide a Cover 5 answer to trips as well. I preface that it’s Cover 5 so all the Sabanites don’t crucify me for blasphemy against the great Nick Saban. (I’m a Sabanite for reference.)
Before we start talking about coverages to Trips I want to begin by saying we never call a Trips coverage unless we absolutely have to. We teach our players the Trips checks to calls in camp/spring, then make weekly adjustments. An example of this might be if their dude is in the slot, we want to check Stump this week. On most Friday nights my voice is gone by the end of the first quarter, so my players better know the adjustments! Alright, let’s get into it!
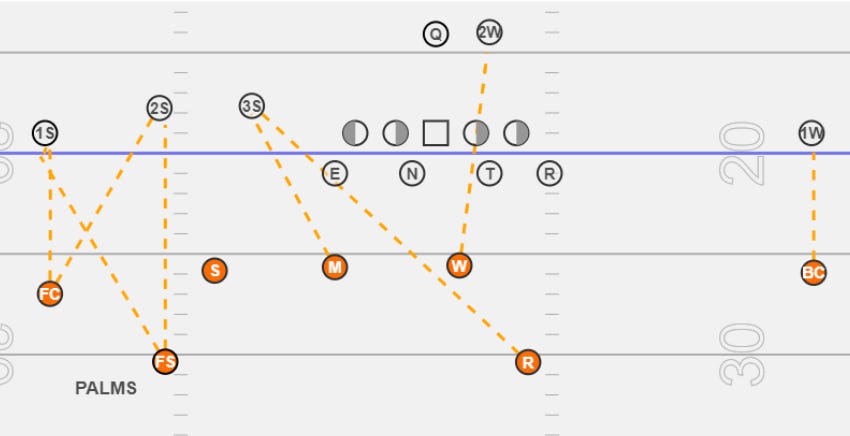
Solo/Poach
Alignment:
Corner: 7x1 outside eye of #1
Safety: 12x1-2 inside eye of #2
Sam/Nickel/Star: LB Depth- Apex
B/S Safety: 10-12 yards in an alignment that he can Poach #3
The first Trips check we cover is Solo/Poach. We typically use this against 11 Personnel Trey Sets (TE + 2 WRs) or YY Sets. We feel this allows the Safety to properly Poach #3 vertical and across. In the past, we’ve tried to Poach #3 in 3 WR open sets and that ended in disaster. So we reserve Solo for 11 or 12 Personnel sets. The rules are simple, we play Clamp to the #1 and #2 receivers while the backside safety is responsible for #3 vertical. If #3 runs an out-breaking route, the Nickel is already playing his “2 to the Flat” responsibility and should be able to handle #3. If #3 is under, it becomes the Mike’s and the Will’s job to pass #3 off appropriately based off the back’s action out of the backfield. The backside corner has his #1 in MEG coverage.
What’s the weakness of this coverage? First, it’s not a true split-field coverage concept. Second, routes by #1 and #2 that occupy the Corner and Safety, and a corner route by #3 make it virtually impossible for the backside safety to get to #3. Are there ways to combat this? Yes, but not without bastardizing the coverage. Typically, we run a complimentary coverage if we get this route combo or think we’ll get this route combo.
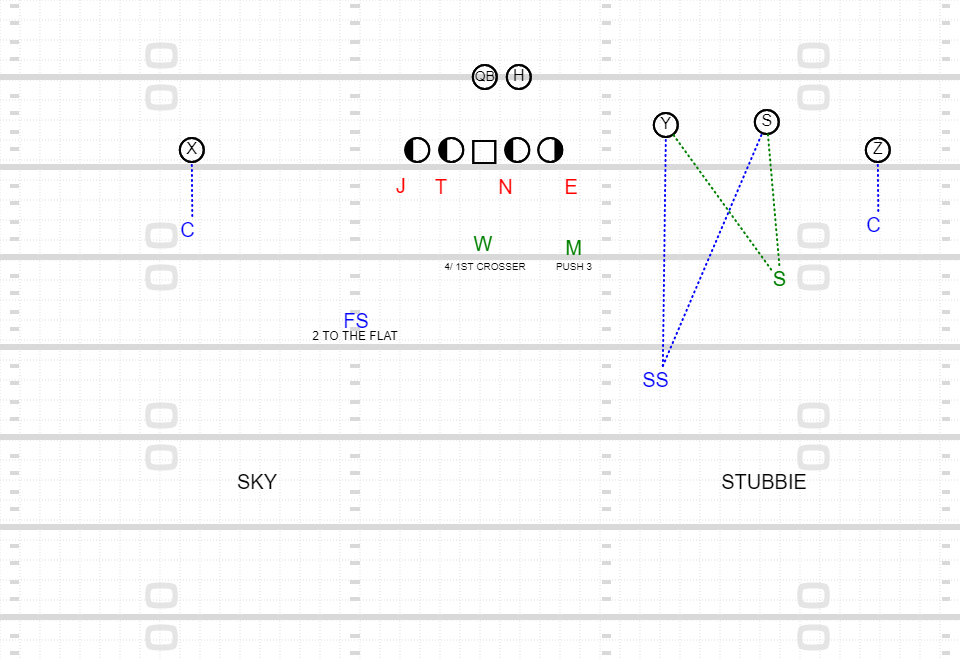
Stubbie/Mini
Alignment:
Corner: Press #1 and play MEG
Safety: 12x1 inside eye of #3
Nickel/Star: 6x1 outside leverage of #2
B/S Safety: Play the backside call
Stubbie or Mini has become the industry standard for base split-field coverage checks to Trips formations. In essence we flip the receivers that we play Clamp Coverage on from #1 and #2 to #2 and #3.
For Stubbie, a Nickel is preferred over a traditional Sam as they can be responsible for the vertical of #2 without help. The rules for Stubbie are as follows: the Corner has #1 in MEG coverage, and the Nickel & Safety play Clamp on #2 and #3. The Mike now plays Post 3, meaning he will cover #3 up to 7 yards. For example, if we got a traditional Stick Route, the Corner would match #1 vertical, the Nickel would take the Out Route by #2, and the Mike would post the Stick by #3. If we get any 4 strong concepts, the Mike becomes the push player, and the Will takes over the Post 3 responsibility from the Mike he pushed. For the backside, they can play Sky, Cone, Cut, etc.
Stump
Alignment:
Corner: 1x8 Inside of #1
Safety: 10-12x1 inside eye of #3
Nickel/Star: 6x1 outside leverage of #2
B/S Safety: Play the backside call
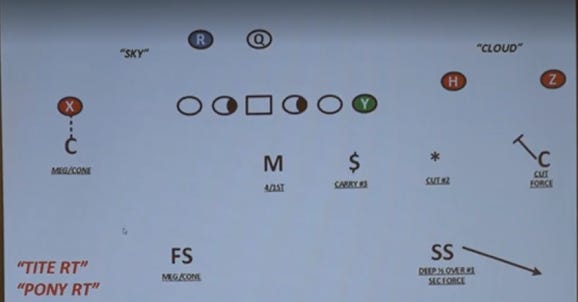
(Image from the Jeremy Pruitt Split Safety Clinic found on YouTube)
Stump is a change-up to Stubbie and Solo that I’d add to the toolbox in the future. In Stump Coverage, the Corner has all of #1 Vertical. If #1 is short, meaning hitch/out/under, then the Corner will zone off in his quarter. The Nickel/Star has first to the flat. The only thing that takes the Nickel out of the flat is if 1, 2, & 3 are all vertical, then the Nickel has #2 vertical. Since the Nickel has no vision of #1, if #1 is short, the Corner must make a Smash, call telling the Nickel to trigger to the flat. The Safety is responsible for #3 vertical. If #3 isn’t vertical, the Safety looks to double cover #2. The interior backer to the passing strength has the Post 3 responsibility.
Clip
Alignment:
Corner: 5-6 yards off Trap Alignment
Safety: 12 yards off and 2-4 yards outside the hash
Nickel/Star: Apex #2-3 at 6 yards
B/S Safety: Play the backside call
(Image from the Jeremy Pruitt Split Safety Clinic found on YouTube)
While Clip Coverage is technically Cover 5, I threw it in because it’s a great change-up and can present as Stubbie, Stump, or Poach. Clip Coverage is a version of Cut Coverage to Trips, and can also be seen as a version of Cloud Cover 3. In Clip, the Corner will trap the flat and sink if he doesn’t get action. The Safety is responsible for the vertical of #1 past 12 yards (modified from Pruitt’s rule of 16 yards). The Nickel/Star’s rule is Cut #2, meaning he is responsible for #2 vertical and inside. If #2 goes out, the Nickel looks to Cut #1. Think Curl/Flat or Slant/Arrow. The next interior backer’s rule is to Cut #3.
Conclusion
Carrying a handful of coverages to Trips is important. The offense always has a change-up, so defensive coordinators need multiple coverages to combat those awful people we call offensive coordinators. It’s important to understand the strengths and weaknesses of each coverage in order to decide when to deploy them during a game. Each coverage is designed to combat certain route combinations, but they’ll never replace watching film and understanding what and when your opponent is trying to attack.


