


Cover 7 Variations vs 2 WR Sets

We’ve all heard of cover 7 whether we recognize it or not. Cover 7, according to Nick Saban, is 2 high split zone coverages. In this article we are going to break down three cover 7 variations, and how we’ve adapted them for the high school level. Again, I stress these are our variations of these coverages based on what worked for us. Below are some Cover 7 rules for 2 WR sets. We’ll cover single receiver backside and trips in another article. Let’s get to it!
7 Clamp
Alignment:
Corner 7x1 outside eye of #1
Safety 12x1-2 inside eye of #2
Sam/Nickel/Star: LB Depth- Apex
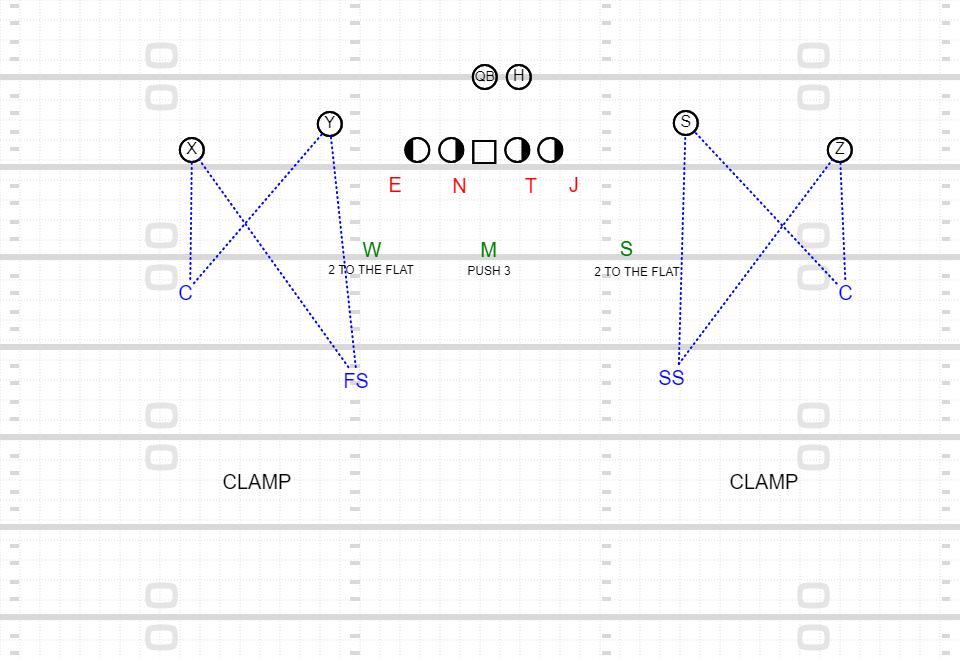
This is a staple coverage for us on early downs. We will base out of Clamp/Palms/2-Read. It’s a hybrid two high coverage that based on the WRs routes that can morph into Cover 2 or Cover 4 very quickly. The general rule is the corner and safety will read the #2 receiver, in a 2 open set. If #2 is out in the first 5-6 yards the corner will take #2 and the safety will flip his hips and now has all of #1.
The safety, however, must make sure his angle when he has to locate #1 is able to intersect with a vertical route first, before adjusting down to any other route. At this point the coverage becomes similar to Cover 2, and the offense will look to throw the “hole” shot.
If #2 does not come out within the first 5-6 yards then the safety has all of #2, unless under, and the corner has all of #1, unless under. For reference we define “under” as drag routes and hitches. We always rally to hitches, as they are considered to be in the “no cover” zone. Slants are not considered an under and the corner must drive on a slant by #1.
Any defensive back who’s man goes under will “zone” off and look for work, which typically means to hunt crossers.

In the example above the Free Safety’s man is under, so he will “hunt the dig”.
Quick teaching point, our backers will turn their back to the QB in this coverage at times. We encourage this so they are able to accurately find their responsibility and get to the hip. Sam/Nickel is what we call “Push 2”. This means on pass, he will push to the hip of 2 then expand to the flat. In a 2x2 set the Will has the exact same rule “Push 2”. The Mike's rule is what we call “Push 3”. If 3 is fast now, the Mike will make a “Push, Push” call to the Sam/Nickel to let them know they now have the back who ends up being the final #2 or flat. Then the Mike will take the new #3 and push to that hip. By hip, we literally tell our guys to get to the hip! Like DB’s we give the backers to ability to hand off “unders”, but they must understand where #3 is. In the example above the Mike must take the under coming across because the Sam/Nickel has already been pushed to the back. Since the Will passed off an under, he also becomes a hunter much like the FS.
7 MOD
Alignment:
Corner: Press Alignment
Safety: 10-12 yards inside leverage of #2
Sam/Nickel/Star: LB Depth- Apex
MOD is press quarters or match Cover 4. Our corners are pressed, at times we play off, and have #1 everywhere but under. Our safeties are at 10-12 and have #2 everywhere they go but under. (We literally call this MOD technique) The Sam/Nickel and Will have “Push 2” rules.

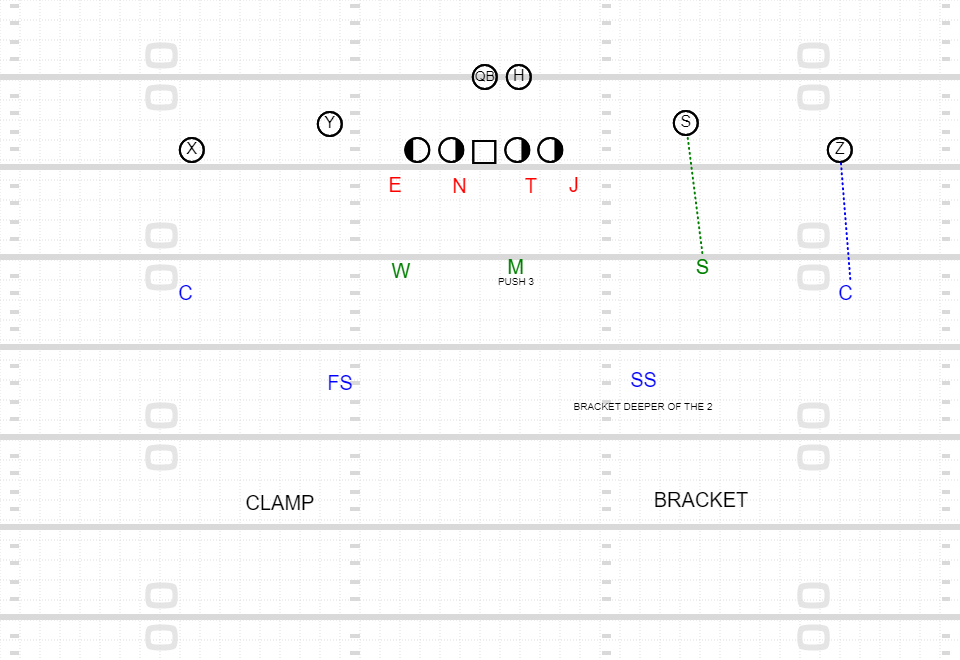
7 Bracket
Alignment:
Corner: Press Alignment (Can also play off at different depth then Nickel/Star)
Safety: 12x2 yards inside of #2
Nickel/Star: 6x1 Outside leverage of #2
For Bracket, you’ll likely need to be in Nickel Personnel, because your overhang, for us it’s the Star/Nickel, has to be able to cover #2 alone at times. For this example we are just going to focus on the front side of Bracket, as I’ve never called full field bracket. (Others do) The Nickel, for us, plays it exactly like he does in Rip/Liz, so he’s 6x1 outside leverage on #2. His rule is he has all of #2 if #2 is Up, Out, or Over. The corner plays #1 with MEG technique. (MEG= Man everywhere he goes) In theory, the safety’s rule is to bracket the deeper of the 2 WRs. Depending on our talent, we will tell the safety to Bracket #2 on any “in” breaking route then expand. Again, make the rule fit your team! The Mike still has push 3, and that still triggers the Star/Nickel to the bac and the Mike now has to take over #2. Thus, why we have the safety lean harder on #2. The Will, pictured as the $ because we call him the money, has whatever the backers rule is for your backside coverage.
Have questions? Feel free to reach out at TheBoardDrillPodcast@gmail.com.